Monday, March 12, 2012

Pull-Apart Cinnamon Sugar Pumpkin Bread

I stumbled upon this recipe on pinterest wile looking for a monkey bread recipe, but I think this one will do just as well. It looks amazing and I can't wait to try it. This is a link to the original blog containing the recipe. I hope you enjoy it!


Pull-Apart Cinnamon Sugar Pumpkin Bread with Buttered Rum Glaze
Ingredients:
     Bread
                     2 Tablespoons of unsalted butter
             1/2 cup milk, at room temperature
             2 1/4 teaspoons (1 envelope) active dry yeast
             3/4 cup pumpkin puree
             1/4 cup white sugar
             1 teaspoon salt
             2 1/2 cups bread flour
            
             1 cup granulated sugar
             2 teaspoons ground cinnamon
             1/2 teaspoon fresh ground nutmeg
             2 Tablespoons unsalted butter 
      Buttered Rum Glaze
             2 Tablespoons unsalted butter
             1/8 cup brown sugar
             1 1/2 Tablespoons milk
             3/4 cup powdered sugar
             1/4 teaspoon rum (If you don't want to use rum you can substitute it with a teaspoon of
              vanilla extract). 

Directions:
  • In a saucepan over medium-high heat, brown 2 tablespoons of butter. Let it bubble up and turn a dark golden brown, but be careful not to allow it burn (turn black). Once browned, remove the pan from the heat and carefully add the milk. Return the saucepan to the stove and heat through. 
  • Pour the milk and butter into the bowl of a standing mixer (fitted with a dough hook) and allow it to cool so it is no longer hot. Once it has reached a warm temperature add the yeast and 1/4 cup of sugar and allow it to proof. This step can take up to 8 minutes. The top will look foamy and the liquid will look cloudy. 
  • Add the the pumpkin, salt, and 1 cup of flour. Stir until combined then add the rest of the flour (1/2 cup at a time) and knead for 6 minutes, or until the dough is smooth, elastic, and just slightly sticky. If the dough is too moist, add extra flour 1 tablespoon at a time.
  • Move dough to a lightly oiled bowl and cover with a clean towel. Allow it to rise in a warm place for 60-90 minutes or until it has doubled in size.
  • While the dough is rising, brown another 2 tablespoons of butter. Add the sugar, cinnamon, and nutmeg and mix well. Make sure the sugar evenly absorbs the butter. Set this aside. 
  • Next, grease and flour a 9x5 loaf pan and set it aside.
  • When the dough has doubled in size, punch it down and flip it out onto a clean, floured surface and knead with hands for 1-2 minutes. 
  • Roll dough into a 20x12 inch rectangle. Evenly sprinkle the dough with the cinnamon sugar mixture and press it into the dough with the palms of your hands. 
  • Cut the rectangle into 6 strips. Lay strips on top of each other and cut each strip into 6 even squares. Cut each one in half and then each half into thirds. Stack the strips vertically and place into the loaf pan. Cover the pan with a clean towel and let the dough rise for another 30-45 minutes.
  • Preheat the oven to 350 degrees F. Bake the bread for 30-40 minutes, or until the top is a very deep golden brown color.
  • To prepare the glaze: Heat the butter, milk, and brown sugar in a small saucepan. Bring it to a boil and then immediately remove the pan from the heat and stir in the rum and powdered sugar.
  • When the bread is done, remove it from the oven and then brush on the glaze and let the bread cool. 
  • Serve and enjoy!
Note: When I try this, I am going to try using some kind of crescent rolls instead of making my own bread. I hope my idea works out well. It would save a lot of time! 

Pepperoni Rolls

These Pizza rolls look like they are really easy to make. They don't need that many ingredients and you don't even have to make the crust yourself! The recipe calls for frozen bread. This is a link to the original blog post where I found the recipe. I hope your pizza rolls turn out well!


Pepperoni Rolls

Ingredients:
             Frozen bread dough
             Pepperoni
             Mozzarella cheese
             Parmesan cheese
             Olive oil
             Italian seasoning
 
Directions:  
  • Loosely cover the frozen bread dough with plastic wrap. Allow the dough to thaw for a few hours at room temperature. When the dough is completely thawed it will be slightly puffed up.
  • Here's a tip: Spray the plastic wrap with cooking oil, or brush it with cooking oil and lay it, oiled side down on the bread dough. This allows the bread dough to rise and move easily under the plastic wrap without it sticking or holding back the dough. 
  • Roll dough out to an approximately 11 x 11 inch square. One frozen dough log makes one pepperoni roll.
  • Brush dough with olive oil or whatever cooking oil you prefer. Lay pepperoni on the dough covering entire surface. Sprinkle with shredded mozzarella cheese. Next, sprinkle it with shredded Parmesan cheese and lightly sprinkle it with Italian seasoning. Add a sprinkling of garlic salt (optional).
  • Roll up the dough starting at one edge of the square. 
  • Place rolls on baking sheet, leaving space between them if you are making more than one roll. Brush some melted butter on top of the uncooked pepperoni roll(s).
  • Bake at 375 degrees F for approximately 15 to 25 minutes. Oven temperatures and times may vary. When done, the top of the rolls should be golden brown and you should be able to make a tapping sound on the crust with your fingernail (the same as when baking bread). 
  • Make sure you allow your pepperoni roll to cool completely before slicing and serving it.
 Note: If I was to try this recipe, I would try using pizza sauce inside of the roll.

Oven-Fried Onion Rings

I love onion rings and have tried a few recipes, but they never turn out that great. Hopefully this one will be different. Plus it they are made in the oven and have to be way more healthy than the other way. This is a link to the original blog containing the recipe. I hope it turns out well and the crust doesn't fall off the onion rings like most of the other recipes I have tried.

Oven Fried Onion Rings
Ingredients:
          1/2 cup all-purpose flour, divided into 2 - 1/4 cups
             1 large egg, at room temperature
             1/2 cup buttermilk, at room temperature
             1/4 teaspoon cayenne pepper
             1/2 teaspoon salt
             1/4 teaspoon pepper
             30 saltine crackers
             4 cups kettle-cooked potato chips
             2 large yellow onions, sliced into 24 rings (1/2 inch thick rounds)
             6 tablespoons vegetable oil
             2 rimmed baking sheets

Directions:
  • Adjust the oven racks to the middle positions. Preheat the oven to 450 degrees F.  
  • Place 1/4 cup of the flour in a shallow baking dish.  
  • Beat the egg and buttermilk together in a bowl.  Whisk the remaining flour, cayenne pepper, salt and pepper into the buttermilk mixture.  
  • Combine the saltines and potato chips together in a food processor and pulse until finely ground.  Place the crumb mixture in a second shallow baking dish.
  • Dredge each onion ring in flour one at a time, shaking off the excess. Dip the onion rings in the buttermilk mixture, allowing the excess to drip back into the bowl. Then dredge each onion ring into the crumb coating. Turn the onion rings to coat them evenly. Transfer the coated rings to a large plate or platter. 
  • Pour 3 tablespoons of the oil onto each of the 2 rimmed baking sheets. Place the baking sheets in the oven and heat until the oil begins to steam, or for about 8 minutes. 
  • Tilt the heated sheets to coat them evenly with the oil. Lay the onion rings out in a single layer on the oiled baking sheets. 
  • Bake the onion rings, flipping them and rotating the pans halfway through baking, until golden brown on both sides, or for about 15 minutes total. 
  • Transfer the onion rings to a paper towel-lined rack briefly before serving.

Sunday, March 11, 2012

Homemade "Fried" Pickles

This recipe caught my eye because I love getting those fried pickle appetizers at restaurants. They are usually a little pricey though, so I don't like that. These "fried" pickles might actually be a little healthier than the ones at restaurants too... they are actually not fried, they are made in the oven without all the grease. Here is a link to the original blog containing this recipe.


Homemade "Fried" Pickles
Ingredients:
                 1 jar of dill pickle slices
                  2 eggs 
          1/3 cup flour 
          1 tablespoon Worcestershire sauce 
          1 teaspoon hot sauce 
          1 teaspoon garlic powder 
          1 teaspoon Cajun seasoning 
          1 teaspoon pepper
          1 1/2 cups panko bread crumbs 
          Ranch dressing and/or hot sauce for dipping 


Directions:
  •  Turn the oven broiler on high
  • In a medium bowl, whisk together eggs and flour. Add Worcestershire sauce, hot sauce, garlic powder, Cajun seasoning, and pepper. Mix well. 
  • Place panko bread crumbs in a shallow dish. Dunk each pickle into the egg mixture, then dredge it into the bread crumbs. 
  • Place coated pickles on a rack set above a baking sheet and sprayed with non-stick cooking spray. Place pan in the middle rack of the oven. 
  • Broil for about 3 minutes on each side. 
  • Let cool and serve with ranch dressing and a dash of hot sauce.

S'mores Cookies

This was actually one of the first recipes that I found on pinterest. I have wanted to try this for a really long time now and I still haven't done it... I don't really have a lot of time to try out new recipes. Eventually, I will try this one! Here is a link to the original blog containing the recipe.


S'mores Cookies
Ingredients:
              11 tablespoons unsalted butter, softened
        1 cup brown sugar, packed
        1/2 cup granulated sugar 
        2 large eggs 
        1 teaspoon vanilla 
        1 teaspoon baking soda 
        1/2 teaspoon sea salt 
        1 teaspoon cinnamon
        2 1/2 cups flour 
        1/2 cup semi-sweet chocolate chips
        1 cup mini marshmallows 
        3 regular sized Hershey's bars, broken into pieces 
        1-2 packages graham crackers broken into squares 

Directions:
  • Preheat the oven to 375 degrees F. Line baking pans with parchment paper. 
  • Lay out graham crackers side by side on pan(s) as close as possible. They should be touching. You may have to add or remove graham crackers according to how much dough you have. 
  • In a medium bowl, whisk together the flour, baking soda, sea salt, and cinnamon to combine. Set this aside. 
  • Using a stand mixer, or a hand mixer, cream the butter with the white and brown sugar until light and fluffy. Then add the eggs and vanilla and mix until combined. 
  • Add the flour mixture too the butter mixture and combine on low speed. 
  • Fold in the chocolate chips and marshmallows. Chill dough in refrigerator for at least 1 hour. 
  • Place tablespoons of dough on graham crackers (on the cookie sheet) about 1-1 1/2 inches apart. Press down slightly with fingertips. 
  • Bake for 5 minutes then remove from the oven to press Hershey's bar pieces on to the top. Place as many or as few chocolate pieces as you want according to how much chocolate flavor you want. 
  • Bake for 5-7 more minutes or until the dough is beginning to turn golden brown at the edges. 
  • Remove to a wire rack to cool. For clean cutting, make sure cookies are completely cool and cut with a sharp knife.  
Note: I haven't tried, but I believe you could use a packaged cookie dough instead of making your own cookie dough to save time and money.

No-Bake Oreo Truffles

I love Oreos and I can't wait to make these. They seem like they are really good and they only have three ingredients. This is a link to the original blog with the recipe in it. Enjoy!


No-Bake Oreo Truffles
Ingredients:
           1 package of Double Stuffed Oreos 
           4 ounces of cream cheese, softened (you can use up to 8 ounces if you want)
       Vanilla flavored dipping chocolate

Directions:

  • Finely chop the Oreos in a food processor. Save some of the finely chopped Oreos for garnish and set them aside for later (you won't need much).
  • With your hands, or a spoon combine the softened cream cheese and the Oreo crumbs until well combined. 
  • Roll the mixture into 1 inch balls and place onto a wax covered cookie sheet. Put this in the freezer for 15 minutes. 
  • While the Oreo balls are in the freezer, melt the chocolate according to the directions. 
  • Pull the Oreo truffles out of the freezer and dip them into the chocolate. Garnish with the reserved Oreo crumbs before the chocolate sets up. 
  • Let the chocolate set, refrigerate, and enjoy!
Note: This is a picture of the chocolate used by the original blogger. She says she only used about half of the package. She also says that the chocolate sticks to the Oreo balls better if you let them set up in the freezer as stated in the recipe. 


Tomato and Mozzarella Pasta

This looks really good and I want to try it ASAP. The recipe doesn't have any meat in it, but I'm sure you could add hamburger or chicken and either would still be good. Here is a link to the original blog with the recipe in it. I hope you enjoy it.


Tomato and Mozzarella Pasta
Ingredients:
                     2 tablespoons of extra virgin olive oil 
            2 crushed garlic cloves 
            2 (14 ounce) cans of diced Italian plum tomatoes
            1 teaspoon dried oregano
            Salt and pepper 
            1 pound of pasta (tubes)
            8 ounces of Mozzarella cheese, cubed 
            2/3 cup grated Parmesan cheese

Directions:
  • Heat the olive oil in a skillet. Add garlic and heat over medium high heat for one minute.
  • Add the tomatoes and oregano. Simmer rapidly, stirring occasionally, for about 15 minutes, or until thickened. Add salt and pepper to taste. 
  • Meanwhile, cook the pasta. 
  • When the pasta is done, toss it with the sauce. 
  • Place half the pasta in an oiled 9x13 inch dish. Cover the top with half of the Parmesan cheese and half of the Mozzarella cheese. 
  • Cover the top with the remaining pasta. Cover the pasta with the remaining Parmesan and Mozzarella cheeses. 
  • Bake at 400 degrees F for 15 minutes. 
  • Let cool and serve. 

Pizza Bites

These look really good, but there are a couple of things I would change about this recipe if I tried it. Instead of buying the pizza dough, I would try using a can of those refrigerated crescent roll things. I'm assuming it would cost less than pizza dough and would work just as well. I would also try using a small amount of pizza sauce in the filling. Here is a link to the original website that I found the recipe on. I hope it works out well if anyone tries it. 


Pizza Bites
Ingredients:
          Enough pizza dough for about one pizza 
          4 ounces of cubed mozzarella cheese (about 20-24 pieces)
          Sliced pepperoni
          For topping: 
                   Olive oil 
                   Italian seasoning
                   Grated Parmesan cheese

 Directions:
  • Preheat the oven to 400 degrees F. 
  • Lightly grease a 9 inch pie plate or cake pan.
  • Divide the pizza dough into 20-24 roughly equal sized pieces.
  • Take one of the dough pieces and top with a slice or 2 of pepperoni. Pull the edges of the dough around the fillings and pinch closed. Place it seam side down in the baking dish. Repeat with the remaining dough pieces. 
  • Lightly brush the tops of the dough balls with olive oil. Sprinkle the tops with Italian seasoning and grated Parmesan cheese. 
  • Bake for 20 minutes, or until the tops are golden brown. 
  • Serve warm, with dipping sauce as desired. 
                                

Saturday, March 10, 2012

No-Bake Peanut Butter Chocolate Dessert

This one caught my eye when I first got a pinterest account. I really want to make this, but there are a lot on ingredients involved. It seems like it would be really good, but very rich. I hope it's not too rich. Oh well, I want to try it anyway. This is a link to the original blog containing the recipe. I hope it works out well if anyone tries making it.


No-Bake Peanut Butter Chocolate Dessert
Prep time: 20 minutes + chilling                        Yield: 12 - 16 servings
Ingredients:
           20 chocolate cream filled sandwich cookies (aka. Oreos), divided
           2 tablespoons of butter, softened
           1 package (8 ounces) of cream cheese, softened
           1/2 cup peanut butter
           1-1/2 cups confectioner's sugar, divided
           1 carton (16 ounces) of frozen whipped topping, thawed and divided in half 
           16 miniature peanut butter cups, chopped
           1 cup cold milk 
           1 package (3.9 ounces) instant chocolate fudge pudding mix

Directions:
  • To make the crust: Crush 16 cookies and toss the crumbs with butter. Press this into the bottom of an ungreased 9 inch square dish and set it aside. 
  • In a large mixing bowl, beat the cream cheese, peanut butter, and 1 cup confectioner's sugar until smooth. Fold in half of the whipped topping. Spread this mixture evenly over the crust. Sprinkle peanut butter cups over the top. 
  • In another large mixing bowl, beat (with a hand mixer) the milk, pudding mix, and remaining confectioner's sugar on low speed for 2 minutes. Let it stand for another 2 minutes, or until soft-set. Fold in the remaining whipped topping. 
  • Spread the pudding mixture over the peanut butter cups. Crush the remaining cookies and sprinkle them over the top. 
  • Cover the dish and chill in the refrigerator for at least 3 hours so the dessert can set up. If you don't wait long enough it will fall apart when you try to serve it.

JalapeƱo Bacon Poppers

I love those jalapeƱo poppers you get from the frozen section, but I have never seen ones with bacon in them. This would be a great opportunity to try them. I want to try variations on this recipe too, like using cheddar cheese and no bacon... I wonder if that would be good? Anyway, This is a link to the original blog containing the recipe. I hope you like it!

JalapeƱo Bacon Poppers
(Yield 16 poppers)
Ingredients:
          1 can of Pillsbury Crescent Dough
            About 2 tablespoons of cream cheese (depending on how much you want to use).
           1-2 fresh jalapeƱo peppers
       3-4 strips of uncooked bacon


Directions: 

  • Preheat oven to 350 degrees F. 
  • Chop the jalapeƱos into small pieces and clean out the seeds. 
  • Cut the bacon into pieces and then cook it. You can also cut up pre-cooked bacon, but it probably won't look as neat and it may crumble. 
  • Roll out the crescent dough and cut each triangle into two smaller triangles with a pizza cutter. If you decide not to do this step you will end up with 8 poppers that are larger than bite sized. 
  • Layer a small dollop of cheese, a piece of bacon, and a piece of a jalapeƱo onto each dough triangle. 
  • Bring the corners of the dough together and twist the top. Push all the edges together to seal them so the filling doesn't leak out. 
  • Bake the poppers for 10-15 minutes. 
  • Let them cool and enjoy!


Creamy Chicken Pockets

This seems like a great idea. I love chicken pot pie, but I don't like the ones in the boxes that come in the freezer. I don't know if I'm the only one who is picky about meat products, but I often get called weird at my house because I don't like those weird processed meats that come out of the freezer section. This would be a great way to make home style chicken "pot pie" bites and bypass all the arguments with my family about why I don't want to eat the frozen pot pies. It looks easy enough and I'm sure it would be better than anything frozen you would buy in the store. This is a link to the original blog that I found this recipe in.


Creamy Chicken Pockets
(Yield 8 pockets or about 3-4 servings)
Ingredients: 
          2 tablespoons olive oil
          2-3 small chicken breasts, diced
          1/2 cup minced onion
          2 cloves garlic, minced (I think you could also use garlic salt and season to taste?)
          1/4 teaspoon kosher salt 
          1/8 teaspoon ground black pepper
          1 tablespoon of softened butter 
          3 ounces of softened cream cheese
          1/4 teaspoon seasoned salt (I would use less if opting for garlic salt instead of cloves)
          2 tablespoons milk 
          1 (8 ounce) package of refrigerated crescent rolls 
          1 tablespoon of melted butter 
           1/4 cup of Italian seasoned bread crumbs for topping (optional) 
  • (You could probably crumble up some Italian seasoned croutons if you have them on hand instead of buying bread crumbs.)
Directions:
  • Preheat the oven to 375 degrees F.
  • Heat the olive oil in a large skillet over medium heat. Cook the chicken with the onions and garlic. 
  • In a medium bowl, beat the cream cheese and 1 tablespoon melted butter until smooth. Stir in the cooked chicken with onions and garlic. Add the seasoned salt, pepper, and milk. Mix well. 
  • Separate the crescent roll dough into the 8 triangles. Dollop a tablespoon of filling into the center of each triangle and fold the corners up to seal. Press and seal firmly to avoid leaks. Place on an ungreased baking sheet and repeat with the remaining dough and filling.
  • Brush the tops with the melted butter and sprinkle with bread crumbs (optional). 
  • Bake for 11-13 minutes, or until golden brown. 
Note: To heat up leftovers, bake in a preheated 350 degree F oven for 10 minutes.

No-Bake Strawberry Icebox Cake

This cake looks amazing and it doesn't even involve turning on the oven! I can't wait to try this one. Here is a link to the original blog with the recipe in it. I hope yours turns out well! 


No-Bake Strawberry Icebox Cake
(Serves 8)
Ingredients:
                2 pounds fresh strawberries, washed
                3 1/4 cups whipping cream, divided
                1/3 cup confectioners sugar
                1 teaspoon vanilla 
                4 sleeves of graham crackers (about 19 ounces or 24-28 whole crackers
                2 ounces dark chocolate, finely chopped

Directions:
  • Take out a few or the best looking strawberries and set them aside for garnish (optional). Hull the remainder of the strawberries and slice each berry into this slices.
  • With a hand mixer or in the bowl of a stand mixer, whip 3 cups of cream until it holds stiff peaks. Add the confectioners sugar and vanilla and whip to combine. 
  • Spread a small spoonful of whipped cream on the bottom of a 9x13 inch baking pan or platter. Lay down 6 graham crackers and lightly cover the top of the crackers with more whipped cream. Add a single layer of strawberries to the top. 
  • Repeat the layering 3 times, until you have 4 layers of graham crackers. Spread the rest of the whipped cream to the top and swirl lightly with a spoon to add a decorative effect. Add a few more strawberries to the top. 
  • To make the chocolate drizzle topping: Heat the remaining 1/4 cup of whipping cream until bubbles form around the edges, then pour over the chopped chocolate. let it stand for a few minutes and then whisk until the mixture is thick and glossy. Drizzle this over the layered dessert with a spoon, or transfer to a squeeze bottle and use that to drizzle.
  • Refrigerate for at least 4 hours, or until the crackers have softened completely. Garnish with additional berries. Serve and enjoy!
Frozen Yogurt Covered Strawberries

These look like they would be great for a snack, or just any kind of treat. Plus they are good for you too! Everyone needs an easy and healthy snack idea. This is a link to the original blog post with the recipe in it. I hope your attempts at making this turn out well!


 Frozen Yogurt Covered Strawberries

Ingredients: 
          Strawberries - Halved or whole (personal preference).
          Vanilla yogurt - The website says the Greek kind works better because it's thicker. 
          Parchment or wax paper

Directions: 
  • Dip the strawberries in vanilla yogurt and then place them on parchment or wax paper and freeze them.

Chocolate Heart Peanut Butter Cookies

When I was younger, I used to make these with my grandma, but we always used Hershey Kisses. I saw this on pinterest and I thought it was a cute idea to use heart shaped chocolates instead of Hershey Kisses. This is a link to the Betty Crocker website the the recipe was originally posted on. 


Ingredients:
            1 pouch of Betty Crocker peanut butter cookie mix
            3 tablespoons vegetable oil
            1 tablespoon water
            1 egg
            2 tablespoons sugar
            36 heart shaped milk chocolate candies (or Hershey Kisses)


Directions:
  • Preheat oven to 375 degrees F.
  • In a mixing bowl: Stir cookie mix, oil, water, and egg until dough forms. 
  • Shape dough into 36 (1 inch) balls and roll them in sugar. 
  • Place the dough balls 2 inches apart on un-greased cookie sheets.
  • Bake 8-10 minutes or until light golden brown. 
  • Immediately press a chocolate candy into the top of each cookie. 
  • Remove the cookies from the cookie sheets and move to cooling racks. 
  • Let the cookies cool for about 20 minutes before storing or serving them.

Strawberry Fudge

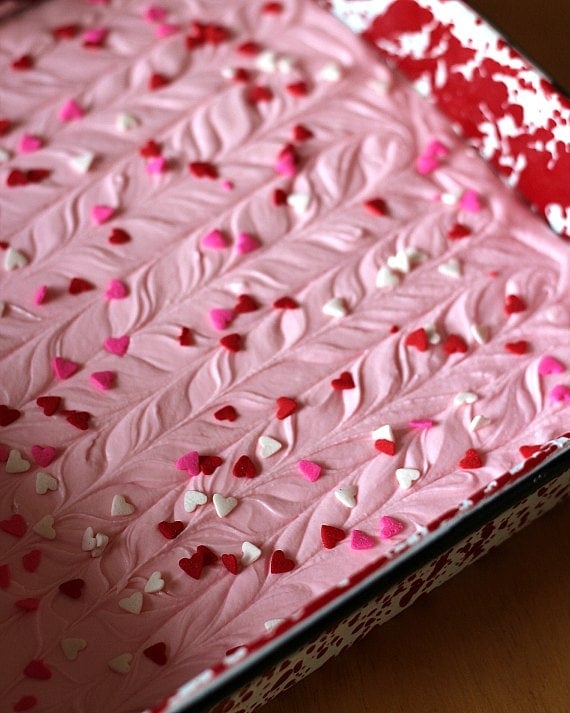
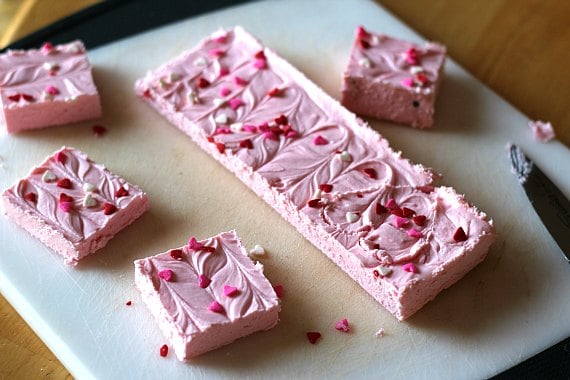
This looks like it may be the easiest recipe ever. It only has two ingredients and doesn't require a lot of prep time. This would be adorable for valentines day if you added heart shaped sprinkles to the top and I think it would be great for any other occasion with M&M's on top. I hope it is as easy to make as it looks! This is a link to the original blog with the recipe in it. 


Strawberry Fudge
Ingredients:
                          1 (16 ounce) can of strawberry frosting
             1 (12 ounce) bag of white chocolate chips 
             Heart shaped sprinkles or M&M's for topping (optional)
             A lightly greased or lined 9x9 baking pan 

Directions: 
  • Melt the white chocolate chips in a microwave safe container or over a double boiler. 
  • Stir in the can of frosting and mix evenly.
  • Spread the mixture into the prepared baking pan.
  • Make designs in the top of the fudge (optional). 
  • Add your choice of topping. 
  • Refrigerate the fudge for 30 minutes or until it sets. 
  • Cut squares or use cookie cutters to make hearts. 
  • Serve and enjoy! 
Note:  Store in an airtight container for up to a week.

Friday, March 9, 2012

Chicken Crescent Role Casserole

I really don't have much to say about this one, other than it sounds great, looks amazing, and I really want to try it! This is a link to the original blog post with the recipe in it.


  Chicken Crescent Role Casserole

Ingredients: 
            2 (8 ounce) cans of Pillsbury Refrigerated Crescent Dinner Rolls
            1 can of condensed cream of chicken soup
            3/4 cup grated cheddar cheese or any other cheese of your choice
            1/2 cup of 18% table cream or whipping cream
            A casserole dish, a saucepan, and a mixing bowl
      For Filling: 
                  4 ounces of cream cheese at room temperature
                  4 tablespoons of butter at room temperature
                  1/2-1 teaspoon garlic powder (optional)
                  1/3 cup finely chopped onion
                  2 large, cooked, finely chopped chicken breasts (or use about 2 of cooked chicken)
                  1/2-3/4 cup finely grated cheddar cheese
                  1/2 teaspoon seasoning salt or white salt 
                  1/2 teaspoon ground black pepper
                  2-4 tablespoons mayonnaise or whipping cream 
                  1-2 cups grated cheddar cheese (for topping)

Directions:                 
  • Preheat the oven to 350 degrees F.
  • Butter the casserole dish.
  • In a saucepan: mix half and half cream, 3/4 cup grated cheese (can use more if desired), and chicken soup. You can season this with black pepper if desired. 
  • Heat this until the cheese melts. Do not boil. 
  • For the filling: Make sure the cream cheese and butter are very soft. Mix them together in a mixing bowl until very smooth. Add garlic powder (if using). 
  • Add the chopped chicken, onion, and cheddar cheese to the filling mixture. Mix until well combined.
  • Add 2 tablespoons of whipping cream/mayonnaise to the filling mixture and stir it until it is well combined. 
  • Season with the seasoned salt and/or black pepper to taste.
  • Unroll the crescent rolls. 
  • Place one heaping teaspoon of the filling mixture on top of each crescent triangle. Then roll the triangles up starting at the thicker end.
  • Drizzle a small amount of the original soup mixture (from the saucepan) on the bottom of the dish. 
  • Place the crescent rolls seam-side down on top of the layer in the bottom of the casserole dish. 
  • Drizzle the remaining sauce mixture on top of the crescent rolls. You don't have to use the full remaining amount of sauce, just as much as desired. 
  • Sprinkle 1 cup (or more, if desired) grated cheese to the top of the casserole. 
  • Bake for about 30 minutes. 
  • Let cool and enjoy.

Pizza Casserole

This recipe looks amazing and I want to try it ASAP! It has been on my pinterest page for months and I keep saying that I will try it, but I haven't found the time yet. This is a link to the original blog post with the recipe in it.


Pizza Casserole

Ingredients: 
             1 bag of egg noodles
             1 extra large jar of Ragu tomato sauce (or any brand you prefer)
             At least 3 cups or shredded mozzarella cheese (more if you like a lot of cheese)
             1 1/2 pounds of hamburger meat 
                    * optional: add diced onions to the meat for more flavor
             1 package of pre-cut pepperoni
             A glass casserole dish
             Aluminum foil

Directions: 
  • Brown the meat and optional onions and drain off the grease. 
  • Boil the egg noodles until soft and drain them. 
  • Preheat the oven to 350 degrees F.
  • Now you are ready to start layering. 
                       Layer 1: Spread a thin layer of tomato sauce on the bottom of the casserole dish.
                                  2: Half of the noodles. 
                                  3: Half of the meat. 
                                  4: Half of the sauce.
                                  5: The rest of the noodles.
                                  6: Half of the cheese. 
                                  7: The rest of the meat.
                                  8: The rest of the sauce. 
                                  9: The rest of the cheese.
                                                                    10: Cover the top with pepperoni.  
  • When you are finished layering, it should look something like this: 
  • Cover the dish with aluminum foil and bake for 30 minutes.
  • After 30 minutes, remove the foil and bake for another 15 minutes.
  • When it's done baking, take it out of the oven and let it sit for 10-15 minutes. (This is to let the casserole cool and to let everything settle together. If you don't let it sit, it will just fall apart when you take it out of the dish.)
  • Enjoy!

No-Bake Chocolate Oatmeal Cookies

When I was younger, I had this recipe, but somehow it disappeared. I'm not sure if this is the same recipe that I had or not, but if it is, these cookies are really good and super easy to make. This is a link to the original blog post that the cookie recipe was posted on. I hope the cookies work out well and you enjoy them!


No-Bake Chocolate Oatmeal Cookies

Ingredients: 
             1/2 cup butter
             2 cups sugar
             1/2 cup milk
             4 tablespoons cocoa powder
             1/2 cup peanut butter
             3-3 1/2 cups quick cooking oats
             2 teaspoons vanilla extract or vanilla flavoring
             wax paper or aluminum foil

Directions:  

  • Add the first four ingredients together in a saucepan.
  • Bring the mixture to a rolling boil and let it boil for one minute. 
  • Stir in the next three ingredients and make sure it is mixed well. 
  • Drop cookie-sized balls onto wax paper/aluminum foil and let them cool until they're set. 
  • Enjoy your chocolate oatmeal cookies! 

Hershey Kiss Cupcakes

This one isn't really what I would consider a recipe, it's just something that seems like a really good idea. When I see things like this on pinterest, it makes me wonder "Why didn't I think of that?!" It seems like a really obvious idea, but nobody ever thinks of it... at least I don't.


Chocolate Cupcakes With Hershey Kiss Centers

Start with cake batter from scratch or boxed cake mix; this step is really just personal preference. Pour the batter into a cupcake pan and bake the cupcakes for 5 minutes. Take them out of the oven and drop a Hershey Kiss in the center of each cupcake. Continue baking the cupcakes until they are done. 

The Hershey Kisses will sink to the center of the cupcakes as they bake and will make a chocolate center.

Thursday, March 8, 2012

Red Velvet Cheesecake Cookies

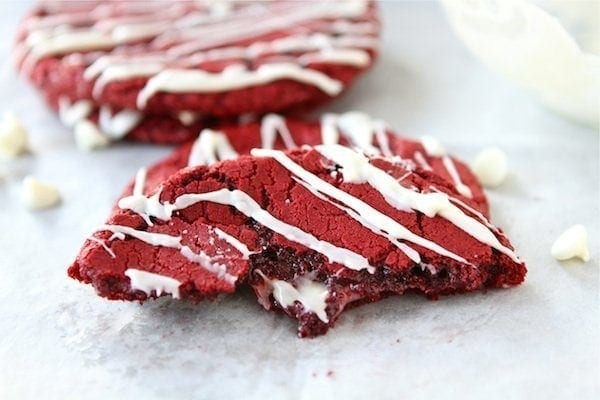
These cookies seem almost too good to be true. The have been pinned on my recipe board on pinterest.com for months now and I still haven't had a chance to make them. They seem easy enough to make and don't require a lot of time in the oven. There is some prepping involved with them though, so they may not be a good idea if you are crunched for time. I have embedded a Link to the original blog post in case anyone wants to read it as well. The link provided will take you to the same blog that was originally pinned to pinterest. 


Red velvet cookies with a creamy cheesecake filling drizzled with white chocolate. 
 
Yield: 10 giant cookies                  Cook Time: 11-13 minutes

Ingredients:
    For the cookies: 
                     1 box of red velvet cake mix
                     2 tablespoons all-purpose flour 
                     2 large eggs 
                     1/2 cup canola oil
                     1 teaspoon vanilla extract

    For the cheesecake filling:
                     4 ounces of cream cheese at room temperature
                     2 cups powdered sugar
                     1 teaspoon vanilla extract

    For the white chocolate drizzle:
                    1 1/2 cups white chocolate chips (melted)


Directions:

1. To making the cookies: In a large bowl combine the cake mix and flour. Whisk until all clumps disappear. In the bowl of a stand mixer, mix together cake mix, flour, eggs, oil and vanilla extract. (This may also be done with a hand mixer.) Mix until smooth. Wrap the dough in plastic wrap and refrigerate for at least 2 hours.


2. To make the cheesecake filling: Use a mixer to combine the cream cheese, powdered sugar, and vanilla extract. Mix until smooth. Use a teaspoon to scoop out the filling onto a plate. Make 10 evenly sized balls of the filling onto a plate and place the plate in the freezer. Freeze this for at least 2 hours.


3. Preheat oven to 350 degrees F. Line a large baking sheet with parchment paper, wax paper, or a silicone baking mat. To assemble the cookies: Take about 1/4 cup of the red velvet cookie dough and flatten in your hands. Place a teaspoon of cheesecake filling in the center and wrap the cookie dough around the filling. Gently roll it into a ball and place it on the prepared baking sheet. Only bake 3 cookies at a time. The cookies are large and will spread! Bake for 11-13 minutes or until the cookies begin to crackle on the top. Let the cookies cool on the baking sheet for 5 minutes. Remove the cookies from the baking sheet and place them on a wire cooling rack to cool completely.


4. Melt the white chocolate chips in a microwave safe bowl or over a double-boiler. Drizzle the white chocolate over the cooled cookies. Let the cookies set until the chocolate hardens. Serve and enjoy!


Note: If you are going to store the cookies for more than a day, you may want to keep them in the refrigerator. If you don't want giant cookies, you can make the cookies smaller... just use less dough and filling. Also, make sure you completely wrap the cookie dough around the filling before baking so the filling doesn't leak out.